One Simple Layout, Three Beautiful Cards!

Thursday, February 25, 2021

Hello there and thanks for stopping by!

Today I'm sharing with you a simple layout that you can use to make some quick and easy cards! I was in such a creative rut yesterday. I had to design for my weekly Facebook Live and I knew I wanted to use some products from our Saleabration promotion, since Saleabration is ending soon (February 28th). I was tired after a long work day and the mojo was just NOT flowing. I sat and stared at the paper and stamps and waited and waited and nothing. Has that every happened to you?

When I'm in a creative rut, finding a good card sketch has never failed me. So off I went to my Pinterest Card Sketch board to look for a sketch. Here's the sketch I used as my jumping off point:

I changed up the sketch a little and created these cards:

I just LOVE the Flower & Field Designer Series Paper, featured on each of the cards. I used the Touch of Ink Stamp Set. Both of these products are currently free as part of our Saleabration promotion, which ends on February 28th. Full disclosure: I have had the Touch of Ink stamp set since December and it only saw ink for the first time today. I wish I had used it sooner, it's such a beautiful set! During Saleabration, the paper is free with any $60 order (CDN) and the stamp set is free with any $120 order. These cannot be purchased, they can only be earned for free with a qualifying order. This promotion ends soon, so if you don't already have these, don't delay!

I used the colours in the designer paper as a guide for the Cardstock and ink colours. Aside from the different Cardstock and ink colours, I used the same embossing folder and embellishments on each of the card, so you just need a few supplies to recreate them!

Here's the Petal Pink Card:


Here's the Pool Party Card:


Here's the Misty Moonlight Card:


Here are the card measurements:

  • Card Base: 4 1/4 x 11, scored at 5 1/2
  • Layer: 3 3/4 x 5, embossed with Tasteful Textile Embossing Folder (optional)
  • Designer Series Paper: 2 x 5
  • any shape for image and sentiment
  • embellishments: Linen Thread and Metallic Pearls 
Here's a video tutorial showing how I made the cards:


I hope you like the cards, please let me know which one is your fave! 

If you love these cards and wish to purchase any supplies, you can do so from my Online Store, I would love to be your Demonstrator! 


Thanks so much for stopping by! 


If you enjoyed this post:


Product List

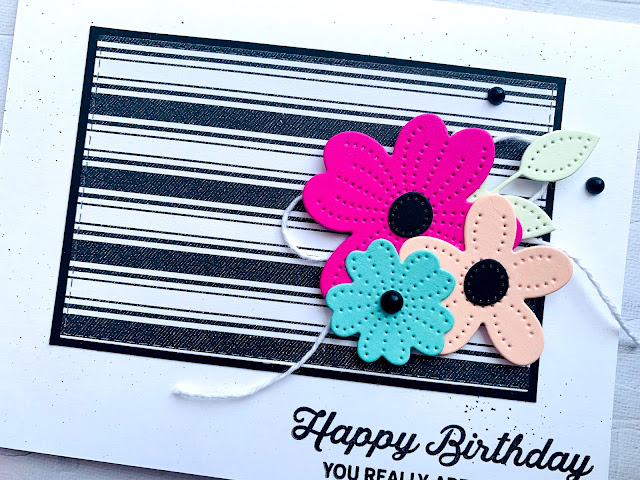
In Bloom Happy Birthday Card

Sunday, February 21, 2021

Hello there crafty friend!

Today I'm sharing a card I created for a card swap with my team. Our fun community of stampers, the Pretty in pINKsters participate in a card swap once a month. If you're looking to find inspiration, fun and friendship with an amazing crafting community, we'd love for you to join us!  You can find more information HERE. In our monthly card swaps, we design and make multiples of a card to send to those that are participating. The theme for this month's swap was birthdays, cause who doesn't need more birthday cards??

Here's my card: 


If you'd like measurements, supplies and a video tutorial of how I made this card, you can find the details below. 

Full disclosure. I love making cards that have black and white stripes with bright flowers. If these were the only cards I ever made, I'd be a happy crafter! 

For this card, I used the In Bloom bundle from the January to June 2021 Mini Catalogue. It's one of my favourite bundles...I love the stamp set with the floral images and sentiments. But OMG my fave in this bundle are the Pierced Blooms dies, they work beautifully with the stamp set but could coordinate with any other products you feel like using as well! The black and white striped designer series paper is part of the True Love Designer Series paper, a beautiful package of all black and white floral and geometric patterns. 


Here are the details for the card:

  • Basic White Card Base: 5 1/2 x 8 1/2, scored at 4 1/4
  • Basic Black Mat: 4 1/8 x 2 3/4
  • Designer Series Paper: Stitched Rectangles Dies 4 1/8 x 2 3/4
  • Die cut flowers, leaves and centres: Magenta Madness, Petal Pink, Coastal Cabana, Soft Sea Foam, Basic Black
Some additional tips:
  • Use a Black Stampin' Write marker to create a splatter background on the white card base
  • Stamp the sentiment in Black Ink - I used Stazon
  • Adhere the Designer Series Paper layer to the black mat
  • Tie a bow using white twine
  • Arrange the flowers and adhere them using dimensional
  • Embellish with Matte Black Dots 
I used different patterns of the designer series paper with this card layout:


Here's a quick little video showing how I put this card together: 


If you love these cards and wish to purchase any supplies, you can do so from my Online Store, I would love to be your Demonstrator! 

Thanks so much for stopping by! 


If you enjoyed this post:


Product List

Snailed It Valentine Cards!

Monday, February 08, 2021

Hey hey crafty friend,

Thanks so much for stopping by my blog today! I have some cute cards to share with you today. But first: a little backstory: On World Cardmaking Day, in October 2020, I told my hubby I was preparing for a special Facebook Live. A lightbulb went off and he asked if I'd like for him to join me for my live. Uh, yes please! Doing these lives is often nerve-racking for me, so having an extra body to share the nerves with was completely welcome! Well it turns out, my audience loved having him there, there were so many encouraging and positive comments, it was so fun! You can view the video HERE. We did it one more time during the fall and then, a long hiatus. After receiving a few messages requesting another stamping session with Rahim, we decided to do it again this past weekend. 

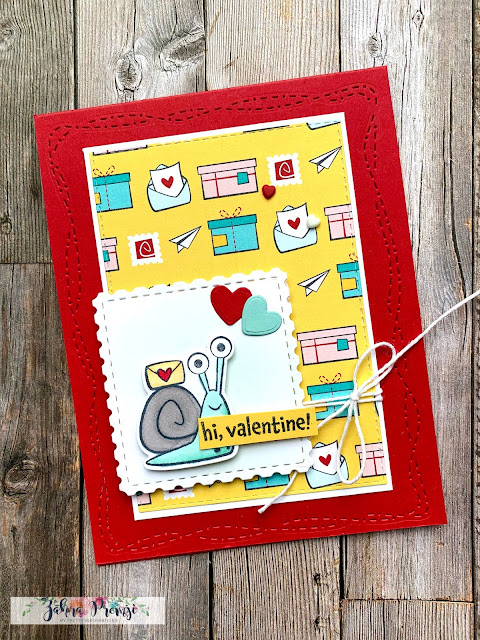
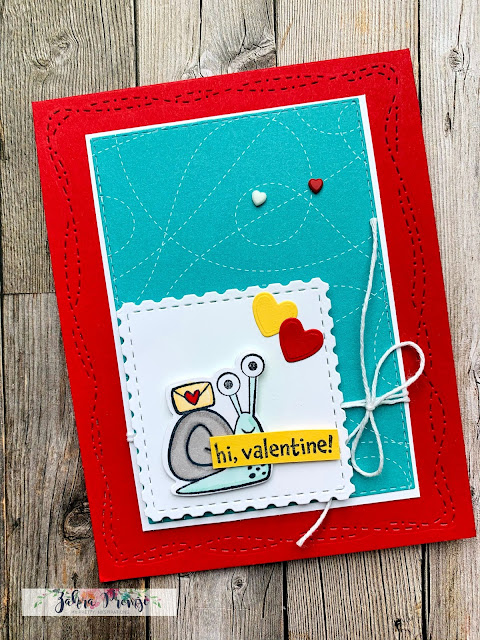
When we stamp together, I usually design a card and then we stamp together, as I walk him through step-by-step, how to create the project. This weekend, with Valentine's Day a week away, we decided to make Valentine's Day cards for the kids. We recently watched the movie Turbo (for the 4th time), so it seemed fitting that we use the snails! Here are the finished cards:

Snailed It Bundle, snail mail, valentine cards, easy cards, card making, paper crafting, stampin up Canada

I gave Rahim a choice of patterned paper, he chose the Bermuda Bay swirly one. I loved the bright colours of the other paper, so it worked out perfectly. We used the Stitched with Whimsy Dies to create the fun border on the Real Red card base, I just LOVE these dies! They're a bit of a hidden gem in the catalogue and can be easily overlooked. The rest of the dies are from the Snail Dies, which are part of the Snailed It Bundle. I think everything about this whole suite is just adorable!

Here are the details and measurements for these card designs:
  • Real Red card base: 4 1/4 x 11, scored at 5 1/2
  • Basic White layer: 3 1/8 x 4 3/8
  • Designer Series Paper: die cut with Stitched Rectangle Dies (3 x 4 1/4)
  • Basic White scrap for postage square die cut: 2 1/2 x 2 1/2
  • Basic White scrap for stamping and die cutting - we used blending brushes to apply a light shading of ink on the white square
  • Stampin' Blends used to colour: Gray Granite, Pool Party, So Saffron, Real Red and Petal Pink
  • Scraps for sentiment and little hearts - we used the 'Hi Valentine' stamp from the January 2021 Paper Pumpkin Stamp Set
  • Embellish with Snail Mail twine (white) and Resin Hearts
Here are more photos of the projects in different colour variations:

This is my card with the Daffodil Delight designer paper:

Snailed It Bundle, snail mail, valentine cards, easy cards, card making, paper crafting, stampin up Canada


Here's Rahim's with the Bermuda Bay swirly paper

Snailed It Bundle, snail mail, valentine cards, easy cards, card making, paper crafting, stampin up Canada

Here's my sample, also with the Bermuda Paper but with some pink accents, for our daughter.

Snailed It Bundle, snail mail, valentine cards, easy cards, card making, paper crafting, stampin up Canada

If you'd like to watch the video replay as well as hear an embarrassing story (for Rahim) about Fiona (someone he went to school with), you can watch it here:


I hope you enjoyed these projects! If you'd like to purchase any products used here and don't already have a Demonstrator in Canada, I would LOVE for you to shop with me! You can find everything in my Online Store or click the supplies icons below. Feel free to reach out if you have any questions or if I can help with anything!

Thanks so much for stopping by! 


If you enjoyed this post:


Product List

Theme by: Pish and Posh Designs